Human Resources > Workforce Administration > Search > Employee > Personal
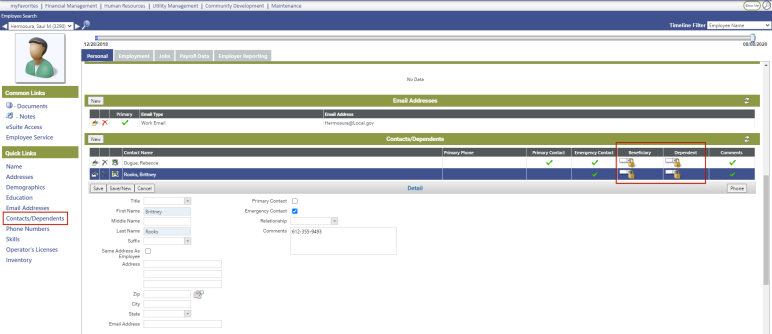
The grid in this section contains an employee's contacts and dependents data, including beneficiaries and the primary contact.
Note: Dependent information is used to set up appropriate benefit plans, send COBRA letters and determine age eligibility and qualifications for benefits. Dependent social security numbers also are passed to benefit providers.
Each contact or dependent corresponds to a row in the grid, with the primary contact appearing in the top row. Remaining rows are sorted alphabetically by Contact Name. At least one primary contact per employee is required.
A lock icon displays for beneficiaries and dependents if the user does not have permission to the ![]() applicable security components.
applicable security components.
To add a contact or dependent to the grid, click the New button, located on the left side of the section header. A Contact/Dependent Detail section opens below the grid, with fields enabled for entry.
To edit contact or dependent data, click the edit icon ![]() , located in the far-left cell of the appropriate row. The Contact/Dependent Detail section opens below the grid, with all fields enabled for entry.
, located in the far-left cell of the appropriate row. The Contact/Dependent Detail section opens below the grid, with all fields enabled for entry.
To delete a contact or dependent from the grid, click the delete icon ![]() , located immediately to the left of the Contact Namecell in the appropriate row.
, located immediately to the left of the Contact Namecell in the appropriate row.
Note: A contact who is enrolled in a benefit plan or marked as primary cannot be deleted until another primary contact has been selected.
To add a phone number for the selected contact or dependent, click the Phone button located in the Contact/Dependent Detail section header. Validation of unsaved entries occurs; after that, a pop-up opens, containing fields for entering phone data. These fields are the same as those in the Phone Numbers section of the Personal tab.
You may store multiple phone numbers for each contact or dependent. Only one phone number may be designated as the primary number for each.
Note: The title of the detail section and availability of check boxes reflects the permissions you have set up in Maintenance.
The following table contains descriptions of the fields in the Contact/Dependent/Beneficiary Detail section:
| Field | Description |
|---|---|
| Title | Prefix or suffix added to the contact's or dependent's name. Click in the field to select from a list of titles. The titles are part of a validation set in Maintenance. To add a title to the validation set, hold down the <Ctrl> key, and click in the field. The Validation Set Value List pop-up for the field opens. |
| First Name | Required. May contain 20 characters. |
| Middle Name | May contain 20 characters. |
| Last Name | Required. May contain 50 characters. |
| Suffix | Contact's or dependent's name suffix, such as Sr., Jr., if applicable. Click in the field to select from a list of valid suffixes. |
| Same Address as Employee | If checked, address information populates with the employee's home address and is read-only. |
| Address |
Contact's or dependent's complete address. The first line of the address and the Zip, City and State are required. An entry in the Zip field automatically populates the City and State fields with the appropriate entries. Click in the Zip or State field to select from a list of valid entries. |
| Zip | |
| City | |
| State | |
| Email Address | Contact's or dependent's e-mail address. The entry must contain the at symbol (@) and the period (.) in the appropriate places—for example, ktaylor@jackpine.com. |
| Primary Contact |
First person to contact in matters related to employee. Select only one Primary Contact. Checking this box automatically checks and disables Emergency Contact. Only one person may be designated as the primary contact. A Primary Contact also must have a Primary Phone Number entered. To enter the phone number, click the Phone button. This check box is disabled if you have permissions to dependents or beneficiaries only. |
| Emergency Contact |
First person to contact in case of emergency involving employee. An Emergency Contact also must have a Primary Phone Number entered. To enter the phone number, click the Phone button. An employee may have multiple emergency contacts. This check box is disabled if you have permissions to dependents or beneficiaries only. |
| Beneficiary |
Identifies the person as a beneficiary of the selected employee's benefit plan, thus tying to Benefits Administration. A beneficiary who has been assigned to coverage cannot be deleted from this page. This check box is disabled if you have permissions to contacts or dependents. |
| Dependent |
Identifies the person as a dependent of the selected employee. This data also ties to Benefits Administration. If this box is checked, Relationship, Gender and Date of Birth are required. A dependent who has been assigned to coverage in the Benefit Plans section of the Payroll Data tab cannot be deleted from this page. This check box is disabled if you have permissions to contacts or beneficiaries only. |
| Relationship | Dependent's or beneficiary's relationship to selected employee. This entry is required for a dependent. Click in the field to select from a list of valid entries. |
| Date of Birth | Contact's or dependent's date of birth. This entry is required for a dependent. |
| Social Security Number | Social security number of the contact or dependent. |
| Gender | Required if Dependent is checked. |
| Student | Identifies whether the dependent also is a full-time college student. |
| Status |
Tells whether the contact or dependent is actively tied to the employee record. The available selections are Active and Inactive. Changing Status from Active to Inactive enables and requires the Reason Inactivated. |
| Status Date | Date the contact's or dependent's Status was established. For new records, this field defaults with today's date. |
| Reason Inactivated | Enabled if Status is changed to Inactive, reason for the inactivation. Click in the field to select from a list of valid reasons. |
| Comments | Free-form text related to contact or dependent. |
To add a phone number for the selected contact or dependent, click the Phone button located in the Contacts/Dependents Detail section header. A pop-up opens, containing fields for entering phone information. These fields are the same as those in the Phone Numbers section of the Personal tab.
If you do not want to save your entries, click Cancel. If you are satisfied with your entries, click Save. The Contact/Dependent data updates, as does the grid.
To save your entries, update the grid and clear the Contact/Dependent Detail section for the entry of another contact or dependent, click Save/New.
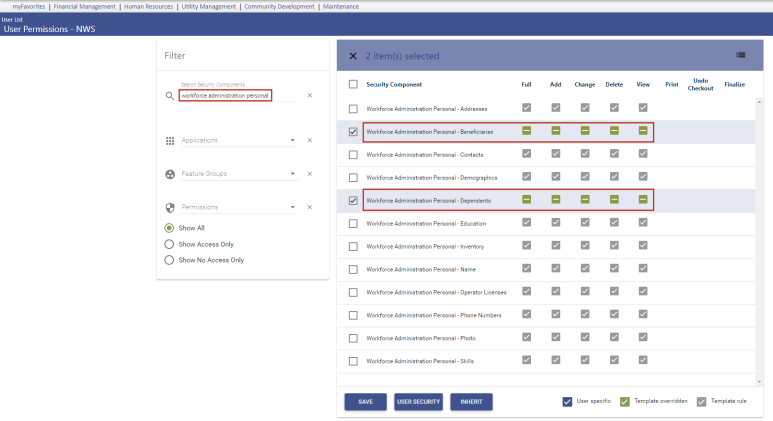
To assign user rights to Contacts and Dependents processing, follow these steps:
- Navigate to Maintenance > new world ERP Suite > Security > Users. The User List page opens.
- Select (highlight) the user to be given rights to Contacts and Dependents processing.
- Click Permissions. The Permissions page for the selected user opens, showing a grid of application components.
- Click the Show Search link in the top-right corner of the page. The Component Name, Application and Company Name search fields display.
- In the Component Name field, type Workforce Administration Personal.
- Select the Human Resources Application.
- Click Search. The grid refreshes to show only the Workforce Administration Personal components.
- In the Workforce Administration Personal - Contacts/Dependents/Beneficiaries row, select the appropriate processes to assign the user.
- Click Save.
-
For the authorization to take effect, the user must sign off and sign on the system.